How to Prep

Welcome to one of our most popular page with landscapers and homeowners alike!

Prep and Installation of Sod

Whether you choose to handle your sod installation yourself
or have your sod professionally installed, it is essential that the area you plan to sod is properly prepped & ready before the new sod arrives.

Beautiful sod can be ruined if it’s left sitting waiting for soil to be spread, or it is subjected to poor preparation or installation practices.

We provide our customers with extra info & tips when your sod order arrives. The following are basic guidelines for the prep work needed to help achieve a lower maintenance, thriving healthy lawn for years to come.

Prepare the site: Depending on your situation you will use one of the following methods.

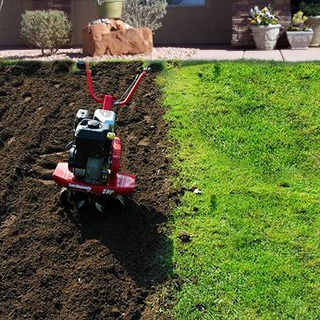
1. Sites with existing lawn grass, weeds or areas being replaced or repaired with new sod:

Remove any existing grass or weeds. This can be done by using a machine or by hand. Break up the top 10-15cm (4 – 6 inches) of soil using a tiller. Remove any debris such as larger stones or clumps of clay.

2. Sites in new developments or new construction:

Remove any debris such as larger stones or chunks of clay. If weeds have grown in they must be removed. Final grade & drainage must be completed before spreading new top soil or installing sod.

Basic Soil & Sod Install Tools:

- Shovel
- Wheelbarrow
- Rake
- Lawn Roller
- Sharp Knife
Be sure to have sufficient watering equipment on hand & ready to use.

Top Soil

Always use an adequate amount of good quality top soil for your project.

Determine the amount of top soil needed for your site & organize the delivery.

New Construction Sites : It’s advisable to order soil based on a minimum 4 – 5 inch depth of new top soil. 
Once spread, leveled and packed with a roller it will result in a 3.5 – 4 inch depth of top soil for your new sod.

You can choose to use more top soil, however, be sure to follow the prep guidelines for best results.

Existing Lawns being renovated or repaired:  Order top soil based on the specifics of the project & take into account any existing good soil on site.

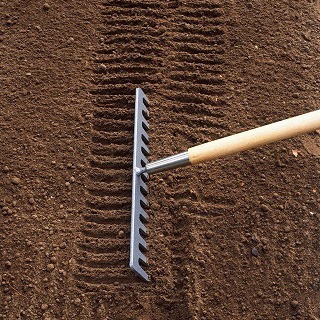
Prepare the top soil:

Spread & level topsoil to a finished approx. 3 – 3.5 inches minimum compacted depth. Your finished top soil grade should be 1 inch below driveways, curbs, walks and patios etc. to allow for ease of mowing. *Be sure to have topsoil in place, spread, leveled & rolled/compacted before sod arrives. That way you are ready to install the sod as soon as it arrives.
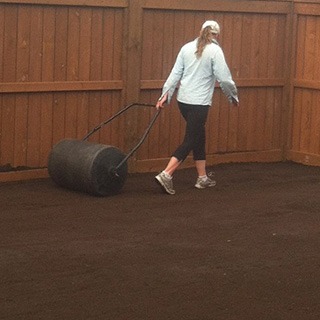
Roll the topsoil:

Using a light to medium weight roller to compact the topsoil reveals any low spots or problem areas. Level & roll again if needed to achieve a smooth level surface.

Install your new sod:

Always use fresh cut sod for your project.
Call us to arrange your sod order for delivery or pickup
  • Begin by unrolling the sod along a straight edge or use a string line.
  • Install the new sod in a brickwork fashion staggering the seams. Please note the photo under sod tips to the right of the screen. Seams will disappear within a few weeks once the sod is rooted and established.
  • Sod pieces should be fit together snugly, with edges fitting tight together, but not overlapped, stretched or any edges pushed upwards.
  • Pieces should be flat on the ground with no buckled, rippled or overlapped pieces.
  • Use a sharp utility, carpet or linoleum knife to cut & trim pieces as needed.
  • Avoid walking or kneeling repeatedly on the sod as you are installing and during the watering process.
  • Do not water the top soil prior to installing otherwise you will have a needless mess of wet mud. The top soil will be soaked during the watering process after installation.
  • Installing sod in rainy or very wet conditions: DO NOT use the sod to walk on, if the top soil is wet from rain or it is raining during the install. This causes air pockets & indentations resulting in brown patches and a bumpy lawn. Instead use wide planks or partial pieces of plywood to disperse your weight as you work in wet conditions. Lift and reset planks or plywood as you work.
  • If your sod has been installed properly, with care, in any & all weather conditions, it is not necessary to roll the sod after it has been installed.
  • It is not necessary to put top soil along the seams or joints in the sod. We DO NOT recommend this practice.
  • It is crucial to water your new sod! Please do not wait for the rain to do it.
  • Please refer to the information that came with your sod order for more ideas and information.

Water your new sod:

  • Have all your watering equipment on hand and ready when you are installing your sod.
  • Begin watering your sod as soon as possible after installing it. Water within at least 30 minutes of completing an area.
  • It does not matter what time of day you finish your sod install the sod must be watered immediately. Do not wait for ‘evening’ or the next ‘morning’.
  • Soak the new sod thoroughly. This means right through the grass to the root side and into the top soil below for a depth of at least 5 cm or 2 inches .
  • Roll back a few pieces of sod and check to see if the soil under the sod is good and moist.
  • Do not under water your new sod and don’t try to to make soup out of the new lawn either. The ground should not be soggy or squishy under the sod.
  • Sod that has not been adequately watered will suffer damage & begin to shrink from lack of water.
  • Check to make sure your sprinklers are reaching to all areas of the yard.
  • If you are installing a large quantity of sod: Begin watering the sections you have completed installing as soon as possible. Do not wait until you have installed all of the sod. Adjust the aim or reposition sprinklers to avoid watering the top soil you’re still working in.
  • The daily watering of your new sod is meant to keep the root mat and top soil moist. Watering is determined by the amount of natural rainfall and temperatures. Hot dry conditions will likely require more watering.
  • In general, once your new lawn is established it will need approximately 1 – 1.5 inches of water or rain a week to stay green & healthy.

Traffic on your new sod:

  • Avoid heavy or concentrated foot & equipment traffic on your new lawn for about 14 days. This allows the sod roots to ‘knit’ into the soil & ensures the surface remains level.
  • Limit the foot traffic to moving the sprinklers until the sod is rooted.
  • The soil beneath the new sod is being kept wet, so excessive traffic on the lawn will compact the wet soil (a real detriment to growth), and can also create low spots, holes or tears.
  • After the new lawn isfully establishedit is quite capable of handling foot & lawnequipment traffic.

Your new sod will root & grow as it settles into its new environment and establishes itself. Enjoy your new lawn! Please remember that caring for your new lawn once it’s established is also very important. Go to our Care & Feeding page for more info. Call (204) 269-3052 if you have any questions or you’re ready to place an order.

Rolling New Sod: CAUTION

  • Rolling newly installed sod is not completely necessary, especially if you have taken care to be sure pieces are making good contact with the top soil and the soil was packed with a roller before installing your sod.
  • Pushing and pulling a heavy roller over freshly installed sod may cause the pieces to shift, resulting in gaps & spaces between the pieces. Please do not roll sod right after the initial watering, this can result in your feet sinking into the soft wet soil and and leave indents, leaving you with a bumpy lawn.
  • NOTE: It is more important to water your new sod, than to spend time rolling sod and risk undoing your hard work!
Scroll to Top